INSTALLATION GUIDE
Installing as a Floating Floor
NOTE: IT IS IMPORTANT THAT YOU MAKE USE OF A PROFESSIONAL FLOOR FITTER IN YOUR FLOOR INSTALLATION. AT ASPIRE FLOORS, WE PROVIDE HIGH-QUALITY INSTALLATION SERVICES WITH A 5-YEAR LABOUR WARRANTY.
Of all engineered floor installation methods, floating floor is the most preferred for these reasons:
- Floating requires an underlay that is more cost effective than the adhesive needed in the glue-down method.
- Floating is easy to install and requires little time.
- It offers one the chance to apply various underlays for a variety of needs e.g. sound proofing and moisture barring.
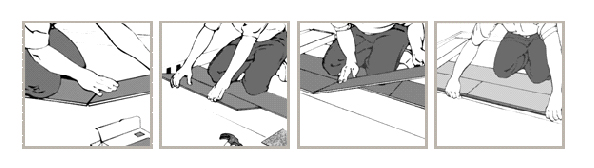
During installation by the floating method, it is important always to use appropriate underlays on the sub-floors like concrete, timber-joints, etc. The underlay can have an equalising function together with either moisture-isolating PE-foam (2mm) or soundproofing underlay (2-10mm thickness). Always start the installation against a long, straight wall. Place the first-floor board with the groove against the wall. Place an 11mm spacer between the wall and the board to keep an expansion seam open. This expansion seam should be observed all around the room, including around doorways, pipes etc. The spacers should be removed 24 hours after completion.
Dab water resistant PVA wood on the tongue of the second-floor board. Before the glue dries, be sure to wipe and residue with a dry cloth. You can then align the second-floor board in the extension of the first and slide the short-sided tongue and groove together. Tap the second venire onto the initial one, making sure all the seams are completely sealed. The last floor board of the original course must be cut to the required size. Complete the row with the cut part, and make sure to begin the second row with the remnant part from the first row. The short pieces of two edging rows need to be distanced as far as they can go. An approximate 50cm space is necessary for the construction of a solid floor.
Ensure that the first two rows are perpendicular and properly connected. You can then maintain a tightly strung cord above the seam to confirm whether the floor is straight. Carefully join the short and long edges together with the use of a tapping block and a mallet. You should never hit the tongue or the groove directly with the mallet. The final row can be installed by sawing the floorboards lengthwise. You can then use a crowbar to slot the last row into position.
Installing as a Fixed Floor
NOTE: ALWAYS USE A PROFESSIONAL FLOOR FITTER WHEN INSTALLING YOUR FLOOR. AT ASPIRE FLOORS, WE OFFER INSTALLATION SERVICES ALONGSIDE A 5-YEAR LABOUR WARRANTY.
Prior to the installation process, ensure that the sub-floor is stable, smooth and level. The Glue-down installation method is superior to the floating floor method, in situations where the sub-floor is imperfect as the boards cannot move. When a sub floor is uneven and you have used the floating floor installation, you may see and hear the floor moving slightly.
I. Concrete/Cemented sub-floors
Before installation, examine the humidity and the levelling of the sub-floor. If you have unlevelled floors, level the uneven floor with a self-levelling cement compound. If the sub-floor has pores, then it is important to apply a layer of primer like Sika Primer MB. Once this is done, you can then proceed to mounting the floorboards to the sub-floor. Always ask for guidance from our sales personnel, whenever you need advice on installation.
II. Other types of Sub-floors
Subfloors can be made of bearers and beams, plywood and particle boards. Engineered floorboards (greater than 15mm thickness) can be secret nailed and glued down to these surfaces. Glue should be applied evenly to the entire underside of the board. It is best to use a Sikabond Glue. To avoid staining ensure you don’t get glue on either the tongue or the groove. While glueing, secret-nail down onto the sides of the boards spacing the nails out evenly. The nail spacing technique will help prevent the boards from sliding while the glue is drying.
